Shrewsbury International School blogging network

Tag archives for Crafts

Paper Helicopter DIY – STEM for Kids

We do love a paper craft… paper is something that most people easily have to hand and with a snip here and a cut there (or just a fold and fold)… you can quickly and easily make ALL SORTS of fun paper toys and paper decorations. 

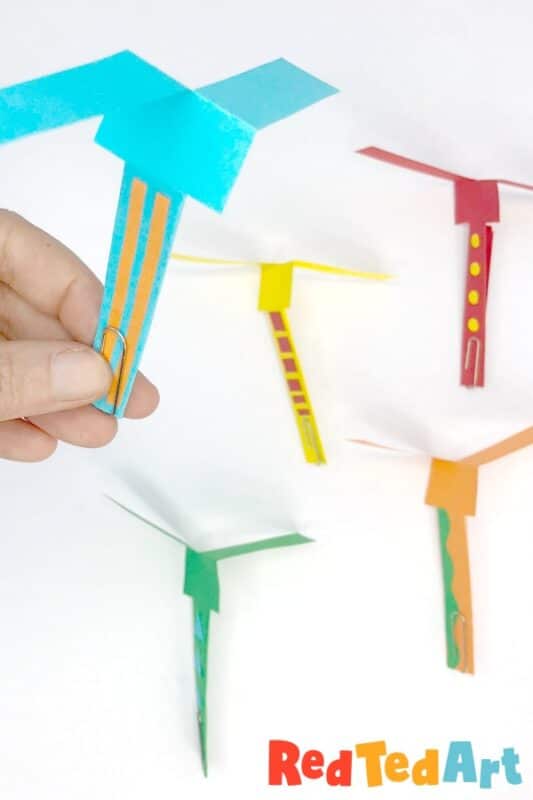
Based on nature’s helicopter seeds these really are a marvel. Get the kids making the basic shape.. and then why not experiment and see how you can turn this simple DIY into a proper S.T.E.M. activity. Get the kids to come up with alterations and predict what will happen to their toy… then explore and experiment what really happens and see if you can figure out why! Super simple science for kids!

Paper Helicopter Toy – materials:

  • strips of paper approx. 21cm x 3cm
  • pens or scraps of paper for decorating (optional)
  • paper clip
  • scissors
  • glue (if decorating!!!)

Yep.. that is REALLY it.. you can probably make these without scissors nor paper clips – with some simple tearing…. making this a super fun on the go little paper craft!

How to make a Paper Helicopter Toy


How to make a paper helicopter step by step PHOTOS!

Paper helicopter

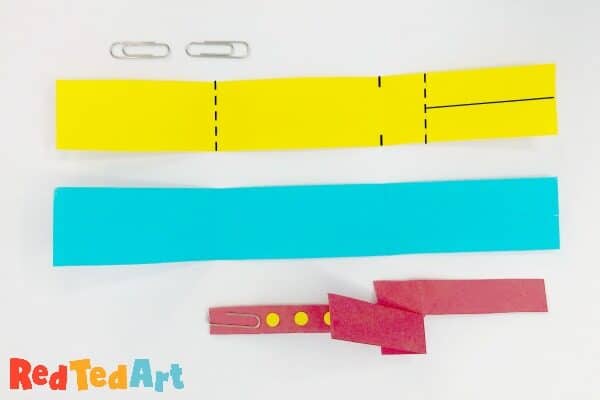
Step 1 – Cut out your strips of paper.

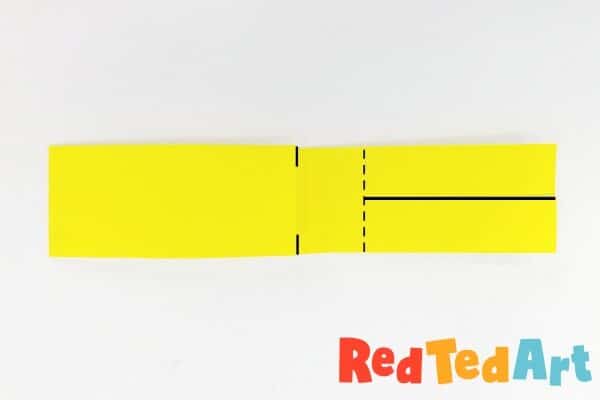
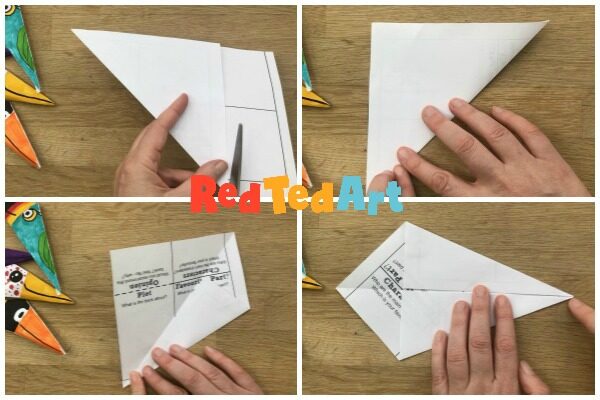
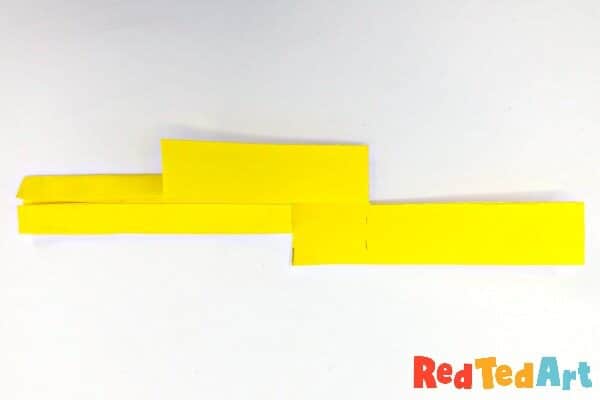
Step 2 – The image shows you the folds (dashed) and the parts to cut (sold it lines).

Fold roughly into 3 parts. 

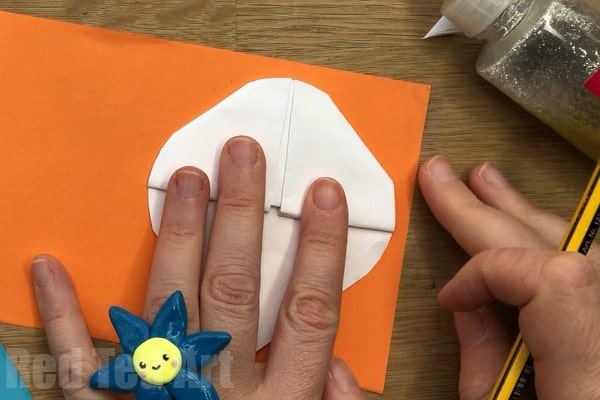
Step 3  – Bring the bottom 1/3 of the paper up and make a neat crease. You should now have a piece of paper that is 2/3 of the original size, with one side a double layer.

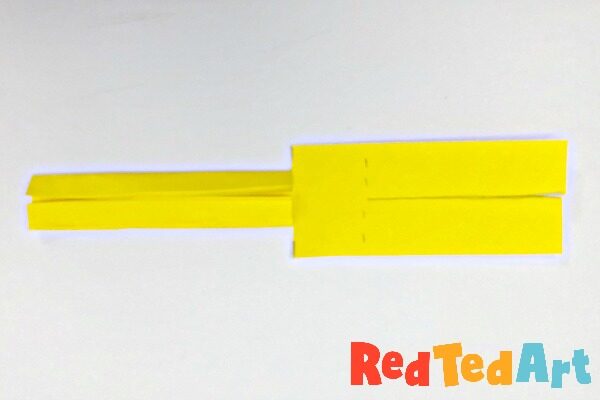
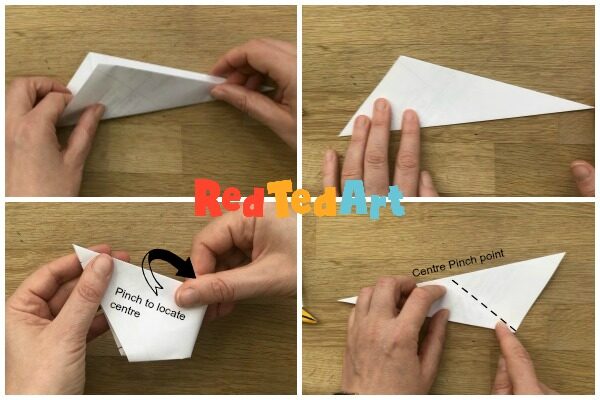
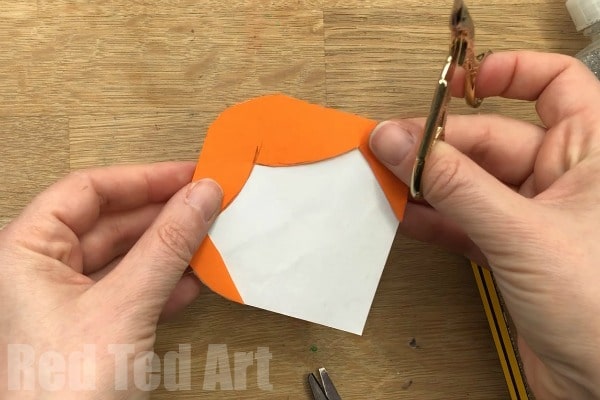
Step 4 – Cut 0.5cm snips on both sides of the top fold. Fold the double sheets of paper inwards along these snips – making a thicker base.

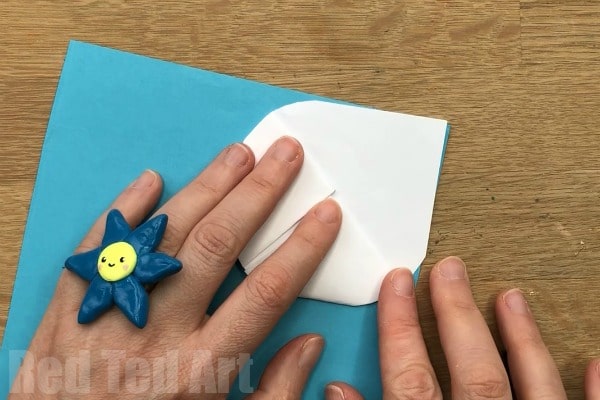
Step 5 – Cut approx. 5cm down the centre of the remaining top 1/3 of the original paper strip.

paper helicopter steam activity

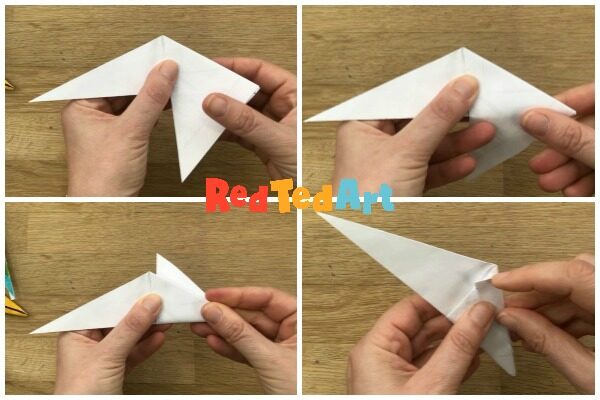
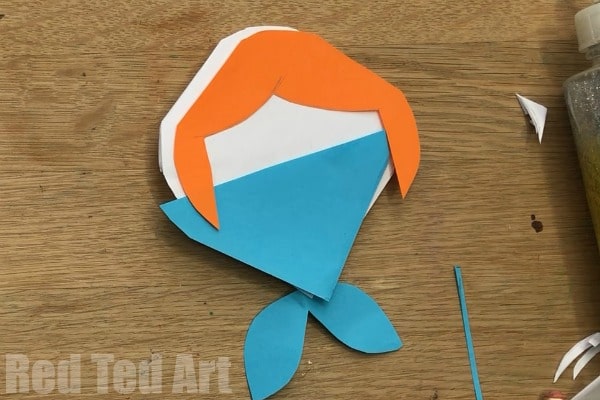
Step 6 – Fold down the created flaps into opposite directions to make the helicopter blades.

DIY Paper Helicopter - easy to make and watch them spin and fly. Then experiment and see how changes effect your paper toy.

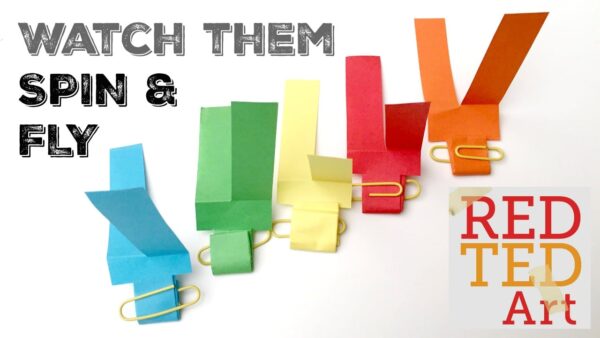
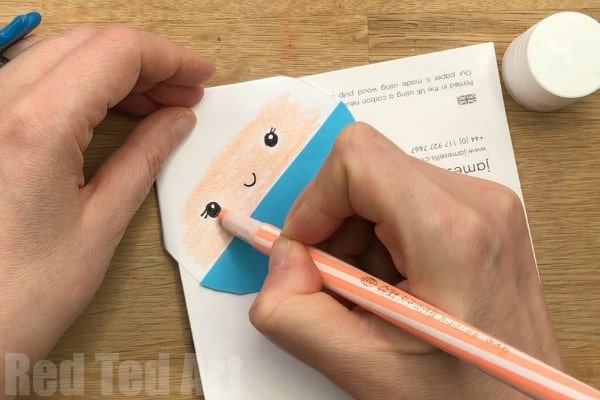
Step 7 – Decorate if you wish and add a paper clip for additional weight to the helicopter.

Experiment what happens with no paper clip, one paper clip and two paper clips… does your helicopter spinner better or faster?

I do hope you enjoyed the Paper Helicopter video. As mentioned previously.. do watch it RIGHT TO THE END to see the Helicopters fly, but also to hear about the extension ideas and how to turn this fun little Paper craft into a proper S.T.E.A.M. activity and really get the kids THINKING and EXPLORING!

Enjoy!!!!

English Storytime

Pete the Cat: Rocking in My School Shoes - Kindle edition by ...

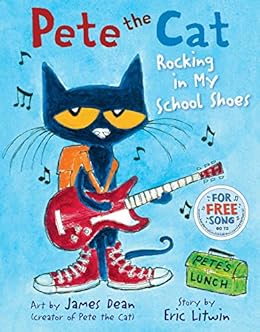
Thursday, July 2nd 2020. English Storytime, Mrs. Rous is reading ‘Pete the Cat Rocking in My School Shoes’ by Eric Litwin.

Thai Storytime

Thursday, July 2nd 2020. Thai Storytime, Miss Toon is reading ‘ขึ้นอย่างไรนะ’ by วชิราวรรณ ทับเสือ และ กฤษณะ กาญจนาภา.

Accessing Storytime Videos:

For Students please visit Firefly to access content.

For Parents of Pre-Prep students please find a link on ILD (Interactive Learning Diary) website to access Storytime videos

Pop Up Father’s Day Card

We have found the craft that anybody would love. Huge thanks to Maggy from Red Ted Art for came up with so many amazing ideas,Well.. we have a fabulous little DIY Pop Up Father’s Day Card for you – especially great for Star Wars Lovers: Yoda Best Dad! Now the best thing about this DIY Father’s Day Card, is that it is perfect for ANY Star Wars fan – be it “Yoda Best Mum”, “Yoda Best Teacher”, “Yoda Best Brother” or “Yoda Best Friend”.. you can quickly and easily adapt the card to suit all occasions. But of course we particularly love it as a DIY Father’s Day Card!

Pop Up Father's Day Card - Yoda Best Dad - fabulous and easy 3D Fathers Day card for Star Wars fans. This can be adapted for Birthdays, Teachers and of course Star Wars loving Mums. Make it from scratch following our step by step guide or use the fabulous Pop Up Father's Day Card PRINTABLES. May the Force be with you. #fathersday #fathers #yoda #printable #fathersdaycard #cards #popup #starwars

AND, the best thing? I show you how to make this Yoda Card DIY either as a step by step process, so you two can make this from scratch OR you can use our handy free Father’s Day Card printables – and you can choose from a Colour yourself card or a ready coloured one… so depending on how much time you have. How short notice this card is for making… you can choose the process to suit you: Make from scratch, print and colour or print and stick. A pop up father’s day card to suit all time scales and abilities!!!

Oh.. and why not make this fantastic Darth Vader Bookmark and add it inside the card as a small Father’s Day gift too??? Just perfect, don’t you think? And why not check out these funny jokes for kids.. and add one to Dad’s card?!

So.. calling all Star Wars fans… let’s take a look and see how this Pop Up Yoda Father’s Day Card is made.

3D Pop Up Father’s Day Card – YODA BEST – Materials:

Pop Up Father's Day Card - Yoda Best Dad - fabulous and easy 3D Fathers Day card for Star Wars fans. This can be adapted for Birthdays, Teachers and of course Star Wars loving Mums. Make it from scratch following our step by step guide or use the fabulous Pop Up Father's Day Card PRINTABLES. May the Force be with you.

If making from scratch –

  • Paper or light card in “Yoda colours”
  • We used light green, beige, brown and white (to create the light saber)

If using the yoda printable

You will also need

  • A5 Card folded in half (or ready made A6 card making card)
  • Background paper/ light card (ours is light blue) in JUST SMALLER than A5
  • Scissors
  • Pens
  • Glue stick

3D Pop Up Father’s Day Card – YODA BEST DAD

You can watch our Yoda Pop Up Card video tutorial or follow the step by step instructions!

Pop Up Father's Day Card - Yoda Best Dad - fabulous and easy 3D Fathers Day card for Star Wars fans. This can be adapted for Birthdays, Teachers and of course Star Wars loving Mums. Make it from scratch following our step by step guide or use the fabulous Pop Up Father's Day Card PRINTABLES. May the Force be with you.

Prepare the card for “popping up”. This is how you make a basic Pop Up Card DIY.

To star your pop up card, make sure your background paper is approximately 1cm smaller than your A5 card.

Fold your A5 Card in Half.

Fold your coloured background card in half. Around the centre of this sheet, cut two 1.5cm strips into your back ground paper.

Fold the strips back onto themselves.

Open up the background paper and push the little square you have created through. As mentioned you can check this Pop Up Snowman Card post for information. The same principles apply to this Pop Up Star Wars card.

Pop Up Father's Day Card - Yoda Best Dad - fabulous and easy 3D Fathers Day card for Star Wars fans. This can be adapted for Birthdays, Teachers and of course Star Wars loving Mums. Make it from scratch following our step by step guide or use the fabulous Pop Up Father's Day Card PRINTABLES. May the Force be with you.

Get your YODA PRINTABLE HERE

Now make your Pop Up Yoda.

As mentioned you can either download your a Yoda to cut and colour or cut and stick… OR You can follow our instructions that easily “deconstructs” Yoda for you and helps you make your very own Pop Up Yoda from scratch!

To Make Yoda’s Head 

Cut a green oval and two pointy ears. The ears a bit like petals. Then cut a small green triangle for Yoda’s neck.

Draw on your face as per my illustration.

To make Yoda’s Robes

Next cut a long thing rectangle to make form the “underneath” clothing of Yoda’s Robs.

You Now need a beige or light brown robes. I cut a conical shaped beige piece out and made sure it fitted to our head and brown “bit”.

After that I cout out a small slice of circle to represent Yoda’s right harm (held behind his back) and another rectangle for the left harm. Yoda’s hand is made out of a circluar green piece of card.

Finally make a light saber out of your white card. I used a silver pen for the halter and a blue/ yellow highlighter mixed for the green light saber light (I didn’t have a green high lighter, ha!).

Now assemble your Pop Up Yoda 

Like a puzzle glue all your pieces together.

Start with the robes and work your way up.

Assembling your DIY Pop Up Father’s Day Card – Yoda Best Dad

Glue the bottom of your Yoda to the small square on the background paper/ light card.

Then glue the background paper onto your A5 card stock. Be sure NOT to add glue to the little pop out bit.

Make sure you smoothen the background down flat.

FINALLY… print out your YODA BEST DAD message, cut and glue in whatever space you like!

And you are finished!! Whoop.

English Storytime

Bears Loose Tooth

Thursday, June 18th 2020. English Storytime, Mrs. Rous is reading ‘Bear’s Loose Tooth’ by Karma Wilson.

Thai Storytime

ผจญภัยกับหนังสือ

Thursday, June 18th 2020. Thai Storytime, Mr.Bank is reading ‘ผจญภัยกับหนังสือ’ by Henk Linskens (เฮ็งก์ ลินส์เค็นส์).

Accessing Storytime Videos:

For Students please visit Firefly to access content.

For Parents of Pre-Prep students please find a link on ILD (Interactive Learning Diary) website to access Storytime videos.

Mermaid Corner Bookmark Design

We have found the craft that anybody would love. Huge thanks to Maggy from Red Ted Art for came up with so many amazing ideas, Please make sure to check out their website and Youtube channel, As you know, we do rather love our corner bookmark designs and have literally over a 100 for you to choose from.. but one glaringly obvious missing design was this darling little Mermaid Bookmark Corner.

Mermaid Corner Bookmark Design. Magical DIY Mermaid Bookmark Craft. Paper Mermaid Bookmark Corner for Summer and Little Mermaid Fans! #mermaids #bookmarks #cornerbookmarks #summer

These mermaid bookmark corners were first published in April 2018

We have Unicorn Corner Bookmarks.. and Mermaid Hug Book Bookmarks (I love these by the way, you simply have to take a look) and finally.. I managed to figure out what a Mermaid Corner Bookmark should look like. We have a whole collection of magical Mermaid Craft Ideas too!

Mermaid Corner Bookmark – Materials

  • A square white piece of paper (can be skin tone too), we used one 15 x 15cm
  • Coloured paper for hair and fins
  • Pens & pencils (for facial details)
  • Sequence or glitter glue for decorating (optional)
  • Scissors & glue

How to make a Mermaid Bookmark Corner

Watch out for the detailed video how to down below or follow the  written steps here!

The Basic Origami Bookmark

Mermaid Corner Bookmark Design. Magical DIY Mermaid Bookmark Craft. Paper Mermaid Bookmark Corner for Summer and Little Mermaid Fans! #mermaids #bookmarks #cornerbookmarks #summer

As with all our bookmarks, begin by making a basic corner bookmark. You can watch the video above or follow these Step By Step Origami Bookmark Instructions here.

Next trim your top on and sides of the corner bookmark.

The Mermaid’s Hair

Mermaid Corner Bookmark Design. Magical DIY Mermaid Bookmark Craft. Paper Mermaid Bookmark Corner for Summer and Little Mermaid Fans! #mermaids #bookmarks #cornerbookmarks #summer

Trace an outline of your mermaids head onto the coloured paper designed for the mermaid bookmark’s hair.

Shape to suit a face.

Cut out.

The Mermaid’s Fin

Mermaid Corner Bookmark Design. Magical DIY Mermaid Bookmark Craft. Paper Mermaid Bookmark Corner for Summer and Little Mermaid Fans! #mermaids #bookmarks #cornerbookmarks #summer

Trace the bottom half of the bookmark in the coloure paper chosen for the mermaids tail. Cut out a triangle.

Then cut out two fins.

Mermaid Corner Bookmark Design. Magical DIY Mermaid Bookmark Craft. Paper Mermaid Bookmark Corner for Summer and Little Mermaid Fans! #mermaids #bookmarks #cornerbookmarks #summer

Assembling the Mermaid Corner BookmarkMermaid Corner Bookmark Design. Magical DIY Mermaid Bookmark Craft. Paper Mermaid Bookmark Corner for Summer and Little Mermaid Fans! #mermaids #bookmarks #cornerbookmarks #summer

Make sure all your pieces fit together and there is enough space for the face. Add the mermaid’s facial details and skin colour.

Glue down the hair and fin.

Finally, decorate the Mermaid’s fin with glitter glue and sequence (optional of course!).

Mermaid Corner Bookmark Design. Magical DIY Mermaid Bookmark Craft. Paper Mermaid Bookmark Corner for Summer and Little Mermaid Fans! #mermaids #bookmarks #cornerbookmarks #summer

Done. Isn’t it adorable?

Mermaid Bookmark Video How To:

And now to our video! Or follow the written instructions below.

English Storytime

Pinkalicious and the Babysitter (I Can Read Level 1) - Kindle ...

Thursday, June 11th 2020. English Storytime, Mrs.Rous is reading ‘Pinkalicious and the Babysitter’ by Victoria Kerr.

Thai Storytime

Thursday, June 11th 2020. Thai Storytime, Miss Gigi is reading ‘โทริเด็กหญิงผมแดง’ by Jeong Taek Chae (ช็อง แท็ก แช).

Accessing Storytime Videos:

For Students please visit Firefly to access content.

For Parents of Pre-Prep students please find a link on ILD (Interactive Learning Diary) website to access Storytime videos.

Easy Pop Up Bear Heart Card

Today we have found the craft that anybody would love. Puppies! Thank you Maggy from Red Ted Art, Oooh I am so excited to share a brand new Pop Up Card Project with you! I am just a little bit obsessed with Pop Up cards.. mainly because they are much much easier to make than you think, and yet oh so fun! This one is a special Valentine’s Day Card for Kids, but would of course also be suitable for Birthdays or Mother’s Day! Make this Pop Up Bear Heart Card/ Cat Card with us today!

Easy Pop Up Bear Heart Card for Kids to make on Valentines, printable worksheets available!

Why it is great to do this craft with your kids

  • Develop fine motor skills & accuracy
  • Reading skills & following instructions
  • Looking at symmetry & basic shapes
  • Fun Seasonal activity

Easy Pop Up Bear Heart Card for Kids to make on Valentines, printable worksheets available!

Pop Up Cat/ Bear Heart Cards – Materials needed

Easy Pop Up Bear Heart Card for Kids to make on Valentines, printable worksheets available!

  • Card Stock for the card
  • Red paper for the heart
  • Contrasting paper for the cat/ bear & decorating
  • Pen
  • Scissors
  • Glue stick

Worksheet instructions plus simple bear template are available on Teacher’s Pay Teacher’s !! In the meantime, our step by step video and instructions provide sufficient information, so that you can make your own!

Easy Pop Up Bear Heart Card for Kids to make on Valentines, printable worksheets available!

How to make a pop up bear heart card

Watch the How To Video for detail instructions! Or follow the step by steps below!

Cut our your basic shapes for your card:

Cut out the templates and trace onto your colored paper. Or create your own as per the video instructions!

You will need:

  • 6 hearts,
  • one oval teddy bear/ cat head,
  • two small circle teddy ears/ triangle cat ears,
  • one oval teddy nose (in a different colour or you can draw it on later)/ small heart shaped cat nose
  • question mark cat’s tail,
  • 4 circle paws.

NOTE: the bear is made up of basic shapes. You can adapt it to create other animals – e.g. add pointy ears for a cat and cut out a tail too. Long bendy ears for a rabbit or floppy ones for a dog.

Make your 3d Pop Up Heart

Fold the 6 heart shapes in half down the middle.

Add glue to one side of one half heart and press a second heart on top of this, so two heart are sticking together.

Repeat until you have a stack of 6 hearts. Put to one side.

Assembling your animal features

Now assemble your bear’s/ cat’s head. Glue the ears and nose in place. With a pen add eyes and any other features – e.g. why not add an outline.

Check positioning of head and heart. Then glue the head onto your card.

Add glue to both remaining outside halves of the heart and carefully glue in place. Make sure the heart “spine” aligns with the line down the centre of your card. Don’t press down too heard on the bottom half of the heart as you need to slide the feet under.

Add glue to the circle paws and glue the hands “on top of the heart” and the feet just under.

Add details in pen and repeat for the other side.

Finishing off your cards with speech bubbles and puns

If you wish you can now decorate the rest of the card with more hearts and speech bubbles.

What puns can you think of?

You are Bear-y nice! I love you Bear-y much!

(We also love these printable bear hug gifts!)

You are Paw-some! You are Purrrrr-fect!

What other animals can you make?

Easy Pop Up Bear Heart Card for Kids to make on Valentines, printable worksheets available!

English Storytime

Amazon.com: Clark the Shark: Lost and Found (I Can Read Level 1 ...

Tuesday, June 9th 2020. English Storytime, Mrs.Rous is reading ‘Clark the Shark Lost and Found’ by Bruce Hale.

Thai Storytime

Tuesday, June 9th 2020. Thai Storytime, Miss Nan is reading ‘โคอาล่าขอเวลา…อีกเดี๋ยว’ by รัตนา คชนาท.

Accessing Storytime Videos:

For Students please visit Firefly to access content.

For Parents of Pre-Prep students please find a link on ILD (Interactive Learning Diary) website to access Storytime videos.

Easy Jumping Frog Origami

Today we have found the craft that anybody would love. Puppies! Thank you Maggy from Red Ted Art,

There are many different times of Frog Origami. Some frogs are wonderfully intricate. Other frog origami are GREAT at jumping. After researching and looking at all the different patterns, I decided that THIS is the BEST Jumping Frog Origami – simply because it is quick and easy to learn HOW TO DO AND it actually works. So this is a great origami pattern for beginners and kids – especially if you just want a bit of fun!! Make them in any colour to suite your taste and needs!

Jumping Frog Origami - the easies origami frog that actually jumps! #origami #forkids #beginners #origamifrog #frog #spring #summer #jumping #papertoy

Jumping Frog Origami Materials:

  • per frog – 1 square sheet of paper – any size. We like using between 12cm x 12cm and 15cm x 15cm
  • OPTIONAL: pens, glue stick & white paper for decorating

How to make Easy Jumping Frog Origami:

We made a little video for you – as Origami is MUCH easier to learn and follow on video! Please do SUBSCRIBE to the channel. It is free to do so and lots of fun!

And watch it JUMP! So fun!! 🙂

Jumping Frog Origami - the easies origami frog that actually jumps! #origami #forkids #beginners #origamifrog #frog #spring #summer #jumping #papertoy

English Storytime

Horrible Bear!: Dyckman, Ame, OHora, Zachariah: 9780316282833 ...

Thursday, June 4th 2020. English Storytime. Mrs. Rous is reading ‘Horrible Bear’ by Ame Dyckman.

Thai Storytime

Thursday, June 4th 2020. Thai Storytime, Miss Toonaor is reading ‘หมูปั๊ก’ (Pig the Pug) by Aaron Blabey.

Accessing Storytime Videos:

For Students please visit Firefly to access content.

For Parents of Pre-Prep students please find a link on ILD (Interactive Learning Diary) website to access Storytime videos.

Star Gazing: Constellation Luminary Papercraft

Today we have found the craft that anybody would love. Puppies! Thank you Maggy from Red Ted Art, Today we decided to create a Constellation Luminary Craft perfect for Star Gazing and learning all about the main 5 Constellations Kids Should Know!

Do you know the stars we live under?! I am sure you already know that those little lights you see in the sky at night time are not just lanterns but luminous balls of gas, mostly hydrogen and helium. And the stars we see do not just move around but in fact create a pattern – a constellation – that we can go look for and recognize time and time again.

This we often call “star gazing”!

5 Constellations Kids Should Know - use this fantastic free Constellations printable to help teach kids about the main constellations in the norther hemisphere #constellations #printables #luminaries #stargazing #stars #homeschooling

So, we created a little “helper” to take with us to find 5 constellations that are pretty famous and with a little practice easy to find – our Constellation Luminary!

Get your printable today, make your own and then go with mom & dad on a little night walk to find the following constellations:

  • Ursa Minor & Major (also called small and big Dipper)
  • Orion
  • Cassiopeia
  • Sagittarius (the so called Tea Pot)
  • Scorpio

Constellations Craft – Supplies needed:

(includes affiliate links for convenience)

  • printable – choose from
  • scissors to cut out the cube
  • scoring tool to score the lines to help with folding
  • tape/glue if you want to make your cube more stable
  • needle or similar to prick little holes for stars into box
  • LED candle light to put inside the box (you can get some online here USUK)

How to assemble your DIY Constellations Luminary

NOTE: you may have to cut out a little bit of the flaps of the “top” of your box to allow the stars to shine through fully. The lid flaps are hard to “prick” through when not glued in place.

This craft is pretty straight forward! We will make a box with tiny holes! ^_^

5 Constellations Kids Should Know - use this fantastic free Constellations printable to help teach kids about the main constellations in the norther hemisphere #constellations #printables #luminaries #stargazing #stars #homeschooling

  1. Print out the template and cut out the box.
  2. Fold the box along the lines. It might be easier to score the lines first!
  3. Stack the box together and add glue/tape if necessary.
  4. With a thick needle prick holes into where stars are illustrated. You can make smaller and bigger holes to show what stars shine more brightly.

5 Constellations Kids Should Know - use this fantastic free Constellations printable to help teach kids about the main constellations in the norther hemisphere #constellations #printables #luminaries #stargazing #stars #homeschooling

And then all that is left to do is to add the LED candle light (DO NOT USE A REAL CANDLE!), close the box and turn of the light!

Happy crafting and do let us know how many constellations you were able to find!

English Storytime

Pinkalicious and Planet Pink : Victoria Kann : 9780062410689

Tuesday, June 2nd 2020. English Storytime. Mrs. Rous is reading ‘Pinkalicious and Planet Pink’ by Victoria Kann.

Thai Storytime

Tuesday, June 2nd 2020. Thai Storytime, Miss Toonaor is reading ‘กอดของฉันอยู่ไหน’ (Wheres My Hug) by Amy Hest.

Accessing Storytime Videos:

For Students please visit Firefly to access content.

For Parents of Pre-Prep students please find a link on ILD (Interactive Learning Diary) website to access Storytime videos.

DIY Paper Spinner Toys

Today we have found the craft that any body would love. Puppies! Thank you Maggy from Red Ted Art, DIY Paper Spinner. Not only were they super fun to make.. but they provide a great STEAM activity for anyone learning about colour theory. It is simply so MAGICAL to see colour theory in action RIGHT BEFOR YOUR EYES.

We made a set of plain spinners (for the kids to colour themselves and to experiment with colours, patterns and designs), but also a set of PRINTABLES! The printables are particularly useful for a classroom setting or if you have LESS TIME, but still want to make this easy paper toy. But I do encourage you to go freestyle, use a plate as a stencil and have fun!

Easy Paper Spinners Tutorial - ever wondered how to make these fun paper toys? They are a super easy kids crafts! And a great way to explore COLOUR Wheel THEORY. So makes a great STEAM project too. You can either experiment to your hearts content or use our super handy Paper Spinner Printables - perfect for colour theory exploration! Make this Kids DIY today!

DIY Paper Spinners – Materials:

  • Paper
  • Card
  • String
  • Pens
  • Scissors
  • Glue stick

Optional – your free templates

———> Get your BLANK TEMPLATES (with patterns) Here <———

———-> Get your COLOUR THEORY TEMPLATES Here <———-

DIY Paper Spinners How To:

Either watch this simple video or read the written instructions below!

We also made an emoji spinner version

  1. Either print out two circles from the templates above OR get a small paper plate (approx 10-12cm in diamater and draw two circles).
  2. Colour in your circles any way you wish. The colours will “mix” on any concentric circles. (see video for the effect). Be bold and experiment with different designs and patterns.
  3. Cut our your circles.
  4. Stick the first circle on some cardboard.
  5. Cut out the cardboard circle now.
  6. Stick the second circle on to the back.
  7. Make two small holes (approx 1cm apart, if not 8mm) on either side of the centre of the circle – the templates have markings for this.
  8. Thread string approx 40cm in length through and tie.

Have a go at spinning!!

DIY Paper Spinner - simple to make and so fun to play with. Great for an STEAM lessons on colour theory
This Paper Spinner really shows colour theory well – you can see how the outer red/ yellow rim turns orange, the blue/ yellow goes a light blue/ green and the red/blue turns a lovely purple. Awesome colour wheel theory exploration!
 
DIY Paper Spinner - Great for an STEAM lessons on colour theory
WHITE LIGHT: when this rainbow spinner is going fast enough it actually appears as white every so often – confirming that “white light” is made up of all the colours of the rainbow. For an accurate “white light”, you would probably have to adjust the proportion of each colour correctly, as well as get it spinning really fast.
 
DIY Paper Spinner - design your own and explore color wheel theory

The kids also had great fun designing their own spinners. They started off with “plain sections” and then looked at what happened when they added red dots and blue zig zags. I think we love these ones best! But they take more time to make as you need time for decorating!

At first it is tricky to get the spin going.. but keep practicing and it will get easier. Once the spin is going, you can relax your hands a little, this will allow for the spinner to “reload in reverse” and keep going!!!!

ENJOY!

English Storytime

Thursday, May 28th 2020. English Storytime. Mrs. Rous is reading ‘Splat the Cat: The Name of the Game’ by James Dean.

Thai Storytime

Thursday, May 28th 2020, Thai Storytime. Miss Nan is reading ‘คุณแกะหายไปไหน’ by Hirotaka Nakano.

Accessing Storytime Videos:

For Students please visit Firefly to access content.

For Parents of Pre-Prep students please find a link on ILD (Interactive Learning Diary) website to access Storytime videos.

Easy Origami Whale – Paper Crafts for Kids

Today we have found the craft that any body would love. Puppies! Thank you Maggy from Red Ted Art, So today we have this adorable Origami Whale. He is quick. He is easy and he is fun!! I think he would also double up as a cheeky “Bailey” from Finding Dory craft, don’t you think?! Enjoy.

Easy Origam Whale for Kids. Super cute, fun and easy whale - a great paper craft for beginner origami kids. How to make an origami whale

Origami Whale materials:

  • 1 square piece of paper
  • scissors (optional)
  • pen & contrasting paper (optional)
  • glue stick (optional)

If you find a printable worksheet with photo instructions useful, you can get a copy over on my teacher’s pay teacher’s store!

How to make an Origami Whale:

It really is EASY!! And the kids will love this adorable little paper craft!!!

Aren’t they adorable?? I particularly like the baby whales. So so cute! Hope you have a go and ENJOY!

Step by step written instructions for how to make an Origami Whale.

If you find a printable worksheet with photo instructions useful, you can get a copy over on my teacher’s pay teacher’s store!

Diagonal

Take a square piece of paper and fold it across the diagonal. Open it up and fold it again in the opposite direction – you want that diagonal crease to go in both direction and be extra sharpe=.

Kite shape

Open up the square again. Take one edge and bring it to meet the diagonal central line. Repeat with the other side – you should now have a kite shape.

Body shape

Fold down the top point to meet the central line. Then fold in half.

The tail

Take the long thing tip and fold up at a right angle. Give it a sharp crease.

Open up the origami and fold into the opposit direction.

Finally, make a small cut at the top of the tail and fold down.

Draw your facial features and done!

Paper Whale Craft
Hope you have a go at making these wonderful Origami Whales!!

English Storytime

Pete the Cat: Play Ball! (My First I Can Read) - Kindle edition by ...

Thursday. May 21st 2020. English Storytime. Mrs. Rous is reading ‘Pete the Cat: Play Ball!’ by James Dean.

Thai Storytime

Thursday, May 21st 2020. Thai Storytime, Miss Toon is reading ‘แบ่งกันนะหมีน้อย’ (How to Share with a Bear) by Eric Pinder.

Accessing Storytime Videos:

For Students please visit Firefly to access content.

For Parents of Pre-Prep students please find a link on ILD (Interactive Learning Diary) website to access Storytime videos.

Easy Bird Finger Puppet Origami

Today we have found the craft that any body would love. Puppies! Thank you Maggy from Red Ted Art You know we adore easy Paper Crafts for kids, right? Well, we have a super duper special and EASY Bird Finger Puppet Origami project for you. These are so easy, and so fun to turn into doodle birds, that you will wonder **where** they have been all your life! So fun.

They make a great addition to our Easy Origami Projects for kids, as well as Paper Puppet collection!

Paper Bird Finger Puppets

Materials needed to make your Origami Bird Puppets:

  • Square piece of paper – we used A4 cut down into two sheets of 15 x 15cm to make two birds (do experiment with different sizes to fit your children’s hands!)
  • Pens for decorating – experiment with pens, biros, pencils, crayons.. whatever you can find!

No scissors. No glue!!

Yep can you believe it, this craft really requires no glue or scissors (well apart from having to cut down paper to a square, but that can be achieved with careful tearing too!).

How to make paper bird finger puppets with scrap paper:

Do watch our easy to follow Bird Finger Puppet video. I always find video instructions sooo much easier to follow.

But have also invluded step by step written instructions below!

This written instructions also include some step photos, which I hope will help you make this cute little Finger Puppet!

Bird finger puppets easy

Here we go… How to make a Paper Bird Finger Puppet

As you can see from the images below, I really did use the paper from my recycling bin! It is a great way to upcycle and still have fun.

Folding your kite shape

Begin my making a square piece of paper. Fold the A4 sheet of paper in half.

Bring one corner up to the central fold. Cut that “triangle” out. When you fold it open again you will have a square.

Fold your square across the diagonal (again) to make a triangle and a nice diagonal crease.

Open up.

Bring one flat edge of the square to align with this central diagonal and start forming a “Kite shape”. Repeat with the other side.

Paper finger puppet

Fold your paper along the diagonal again (so your other fold are on the inside).

You now have one long edge. And two short ones. Fold the long edge in half to find the mid way point and pinch as a “marker” (bottom left photo).

Open again.

Fold up the short edge to make a crease (the video shows this really well- or look at the dashed line in the image!) -(bottom right photo).

Paper birds

Folding the paper down (top left photo).

And then back up (top right photo).

Now wrap the paper around itself and “tuck in”.

decorating your bird finger puppets

One side will show the “folds and tuck”. This is the “rough side” (but can of course still get decorated).

Flip over and you get a “neat” side – this is the side that is easier/ more fun to decorate!

Your basic bird is finished.

Be as creative as you like! Invent your own birds or google your favourite types of bird and be inspired by their beaks and plumage. Maybe you can make some parrots, some parakeets, some puffins and more?!

How to make your paper bird point the other way?

If you want the “Neat” side to point the other way, make the folds in the other direction.

Finger Puppets made from paper

Now it is time to have fun with decorating!! Use lots of colours and have fun.

English Storytime

Tuesday May 19th 2020. English Storytime. Mrs. Rous is reading ‘When Gorilla Goes Walking’ by Nikki Grimes.

Thai Storytime

Tuesday, May 19th 2020, Thai Storytime. Miss Nan is reading ‘เธอเห็นฉันไหม’ by อัญชลี อารีย์วงศ์.

Accessing Storytime Videos:

For Students please visit Firefly to access content.

For Parents of Pre-Prep students please find a link on ILD (Interactive Learning Diary) website to access Storytime videos.

Origami Owl Pencil Topper

By  Maggy, from  https://www.redtedart.com/origami-owl-pencil-topper/

How to Make a Origami Owl Pencil Topper

Before we do, we need these:

  • 3inch Square Paper (approx 7.5cm x 7.5cm)
  • Pens for decorating (or googly eyes and buttons)

How to make Origami Owl Pencil Toppers

We are really thankful for the craft idea. If you are interested, please do not forget to hop over to Jenny’s channel now and subscribe supporting her. She really has some fabulous and quirky paper crafts for you to discover and have a go at.

– English Storytime

Thursday, May 14th 2020. English Storytime, Mrs. Rous is reading  Rhinos Don’t Eat Pancakes  by Anna Kemp.

– Thai Storytime

Thursday, May 14th 2020. Thai Storytime. Miss Tonaor is reading ‘ปีเตอร์ นกพัฟฟิน‘ (Puffin Peter) by Petr Horácek; translated to Thai by Miss Tonaor.

Accessing Storytime Videos:

For Students please visit Firefly to access content.

For Parents of Pre-Prep students please find a link on ILD (Interactive Learning Diary) website to access Storytime videos.

Thanks kindly,

SHR’s librarians

« Previous Entries
Next Entries »